Basic setup in 5 minutes
It takes you only 5 minutes to complete initial setup to start sever your online customers.
- Registration – Forever Free Plan (2 minutes)
- Ready to serve you – Setup completed and ready to handle customer chats (1 minute)
- Integrations – WordPress, Any HTML webpages, Shopify. (1 minute)
Step 1: Registration – Forever Free Plan
Register your account Here
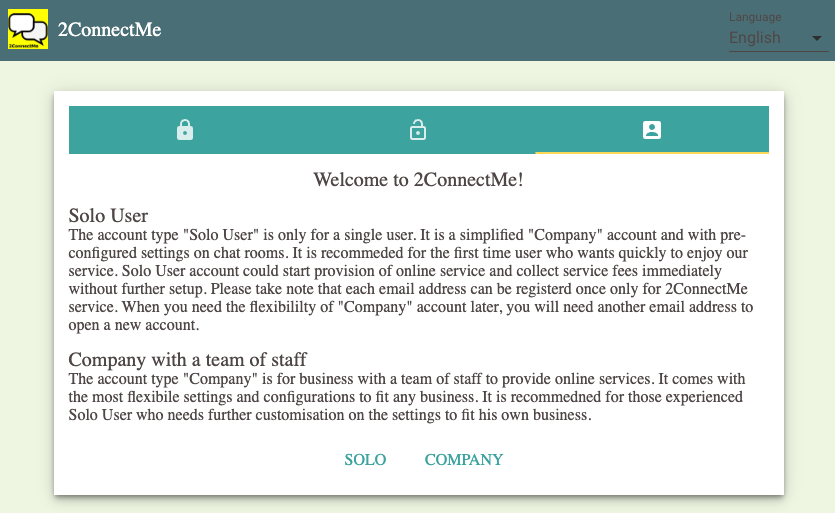
Two types of Forever Free Plan are avaialbe. One is for solo user and the other is for a company with a team of service staff.

- Solo user: it is a simplified “Company” account and with pre-configured settings on chat rooms. It is recommeded for the first time user who wants quickly to enjoy our service. Solo User account could start provision of online service and collect service fees immediately without further setup. Please take note that each email address can be registerd once only for 2ConnectMe service. When you need the sophisticated color theme customisation or configuration such as contact form, white label settings or closed integration with your website, it requires full flexibililty of settings in “Company” type account. You will then need another email address to open a new account.
- Company with a team of service staff: The account type “Company” is for business with a team of staff to provide online services. It comes with the most flexibile settings and configurations to fit any business such as contact form customisation, white label settings and integration with websites. It is recommedned for those experienced Solo User who needs further customisation on the settings to fit his own business.
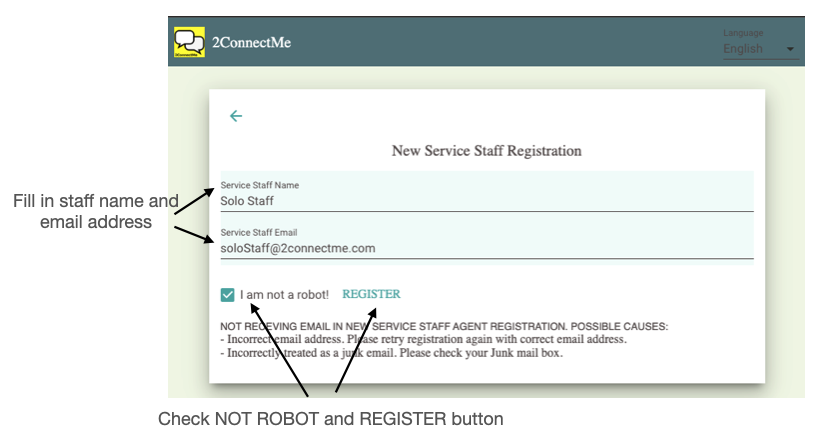
Forever Free Plan – Solo User
As a solo user account, just fill in the staff name and email address to register the account. The email address in registration cannot be changed once used.
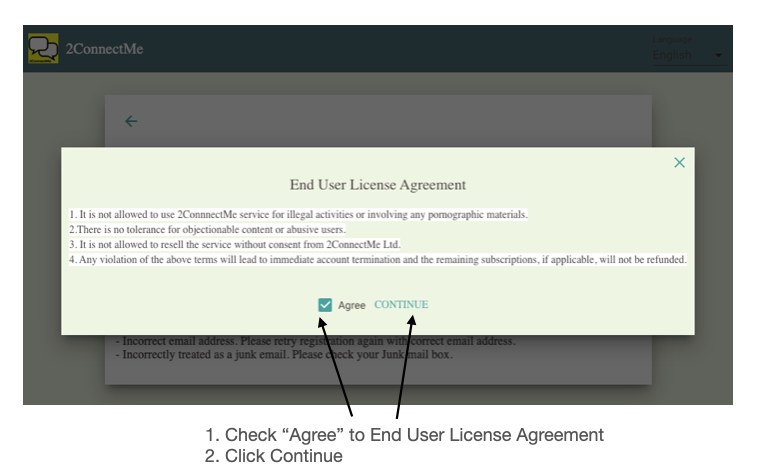
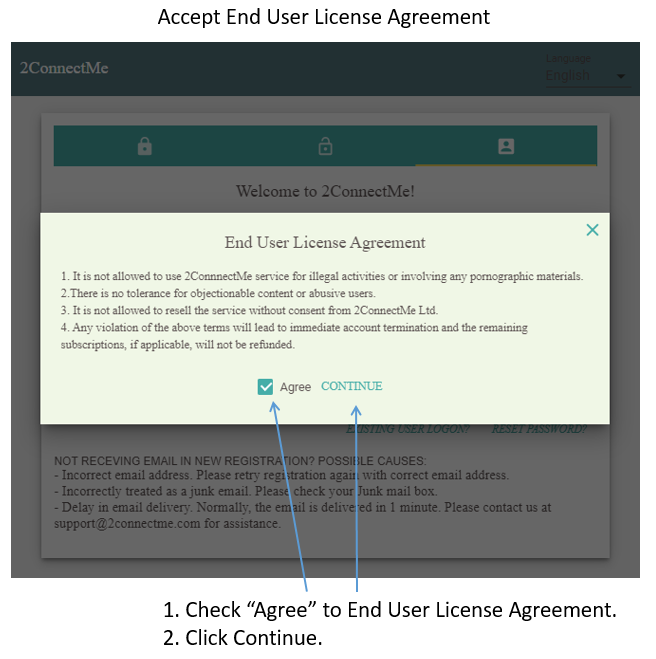
Accept End User License Agreement
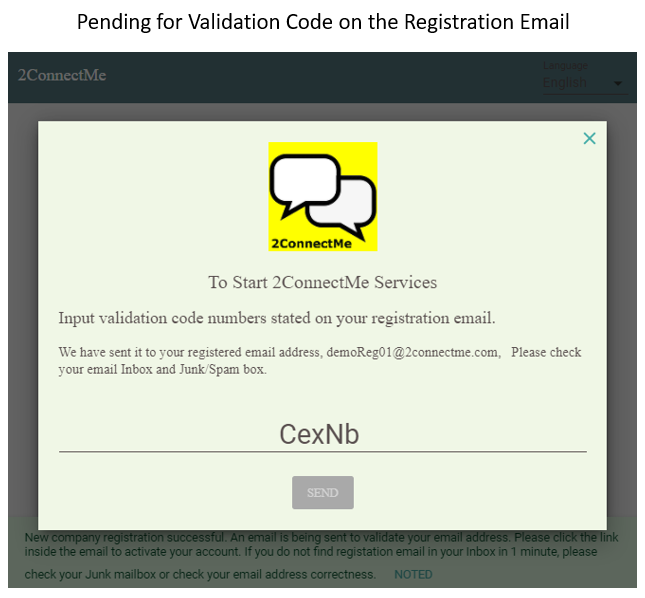
Pending for validation codes on registration email
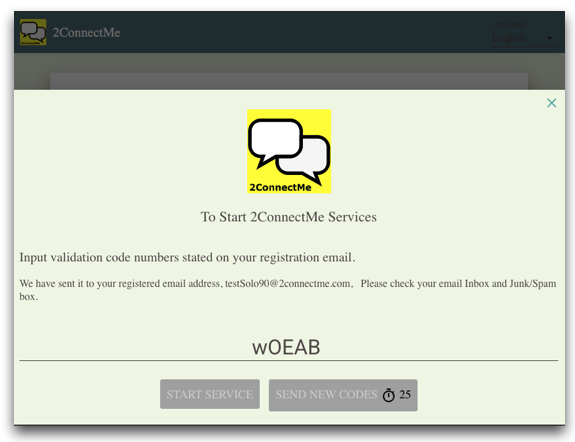
Staff email address validation
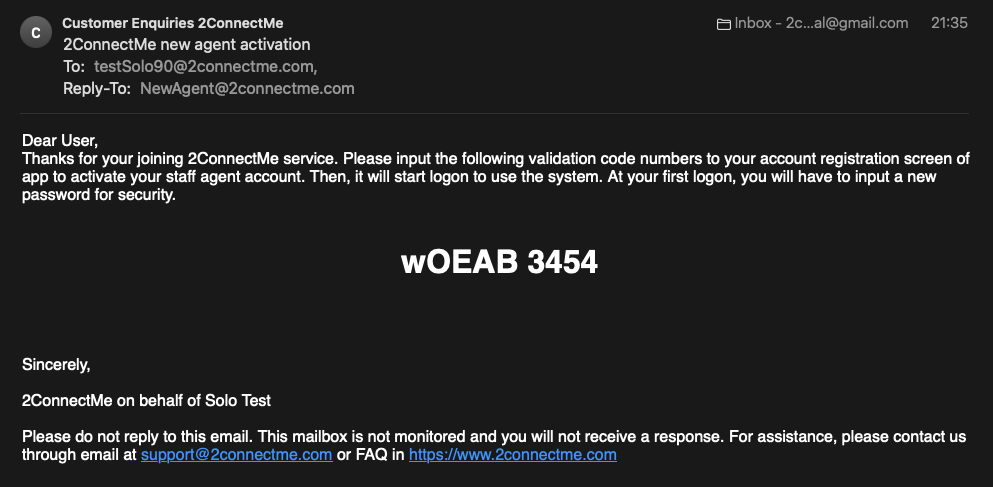
After “Agree” to end user license agreement, an email is sent to registered address with the validation codes.
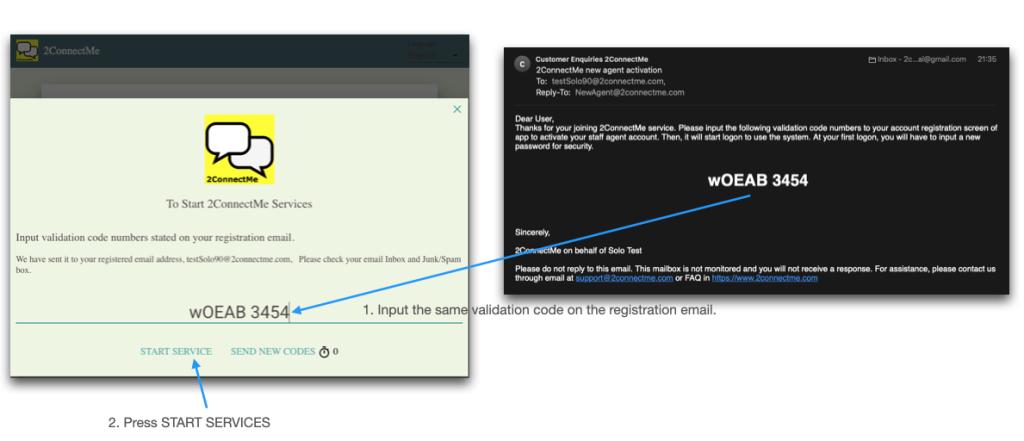
Such validation codes should be copied to staff registration form and then START SERVICES button.
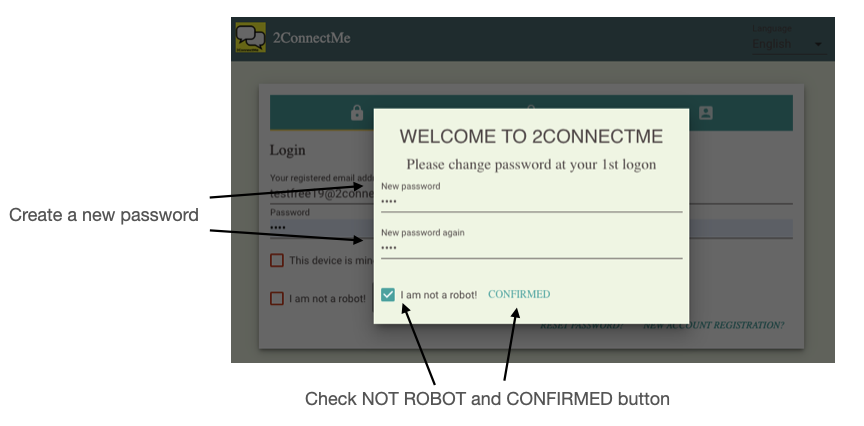
At the first logon, the service staff will be prompted to input the password for future logon.
New password at first logon
At the first logon, the service staff will be prompted to input the password for future logon.
Successful logon
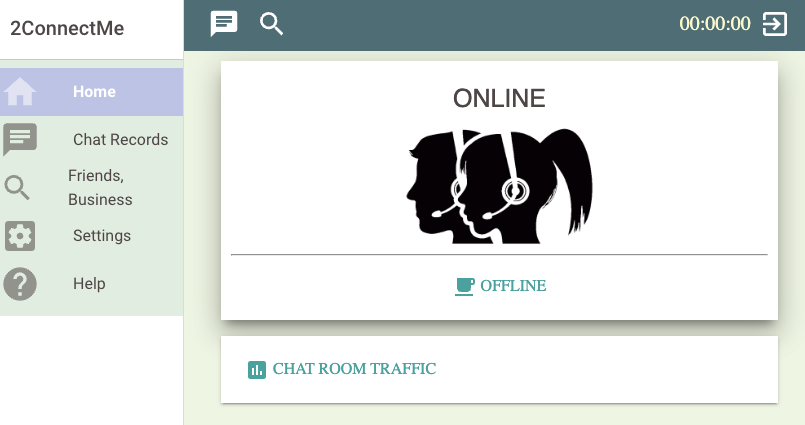
After successful logon, an email with information about Url for chats and account information is sent to registered email address. Solo user is empowered to start to chat with customer immediately. Go to Ready to serve you here now.
Forever Free Plan – Company
The key information is the email address to be registered. The email address will be used as administrator account to logon to 2ConnectMe. Please be alerted that once the email address is registered as administrator account, it cannot be changed later. Therefore, please be careful in selecting your email address for administrator account.
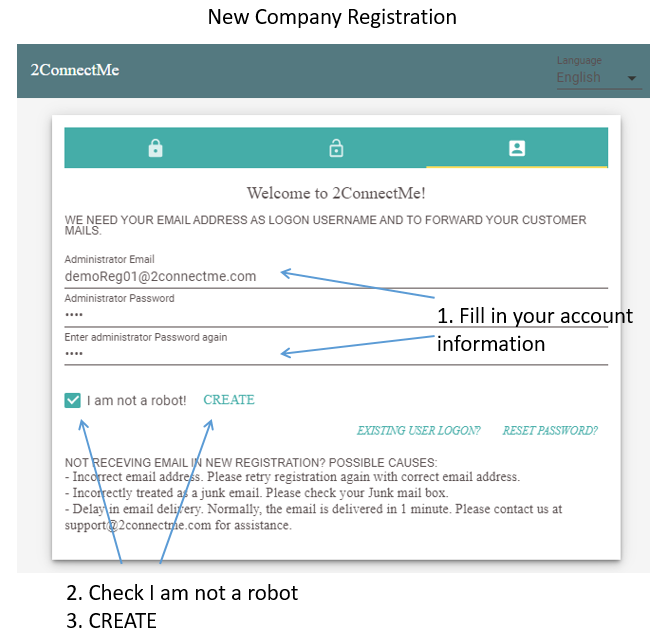
Registered email address verification
An validation code number is sent to your registered email address. Just enter those numbers on the registration screen and it will divert you to agent desktop screen. If you do not find the registration email in your Inbox in 1 minute, please check your Junk/Spam mailbox. Sometimes, email systems wrongly treat it as a Junk/Spam mail.
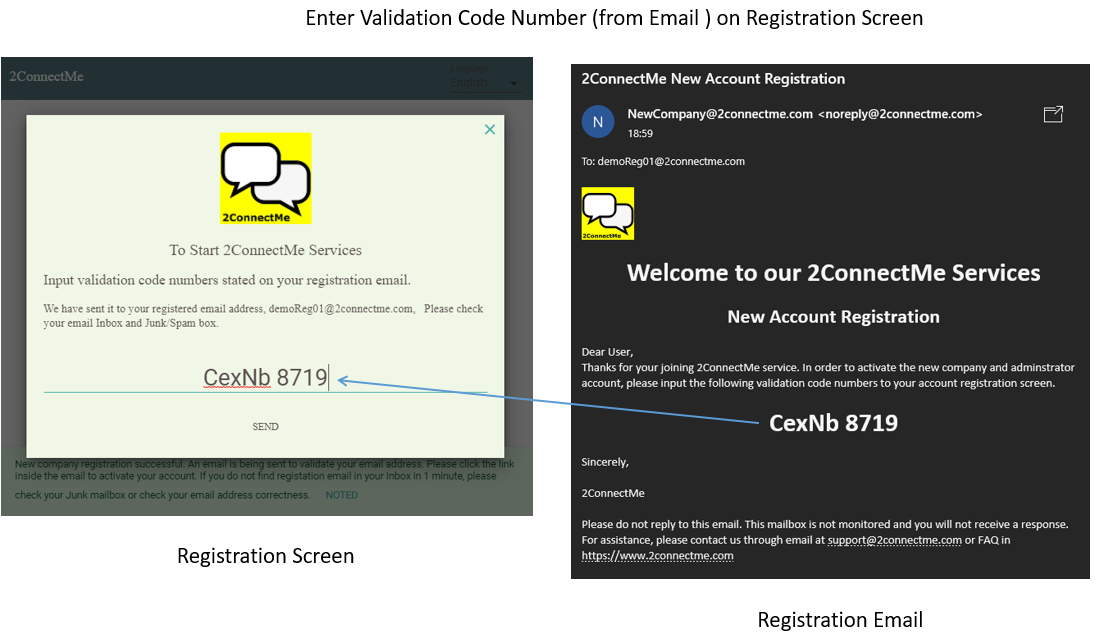
Successful Company Activation & logon first time to accept defaults
After entering the correct validation code numbers on the registration screen, you will then logon to 2ConnectMe Admin Console. For the first time logon, initial setting wizard helps you setup the service with the minimal configurations. The Initial settings can be changed at any time later. However, it is highly recommended to input all the information to avoid unexpected behaviors of the service.
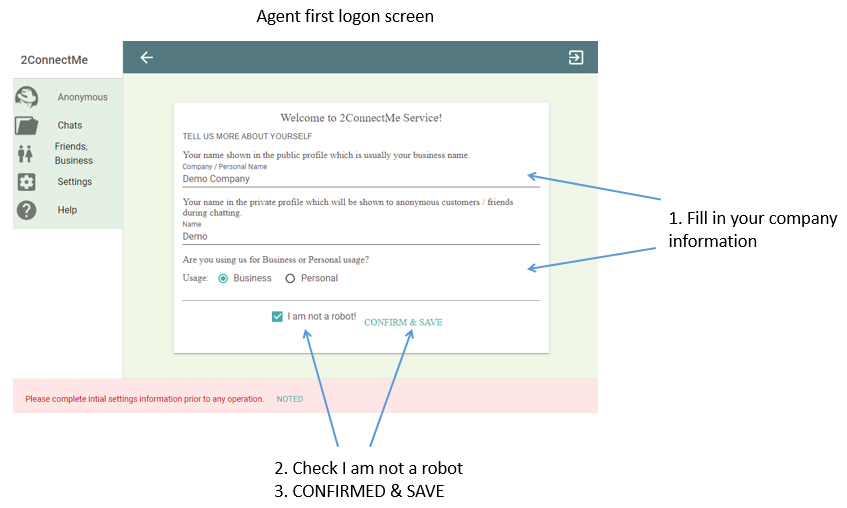
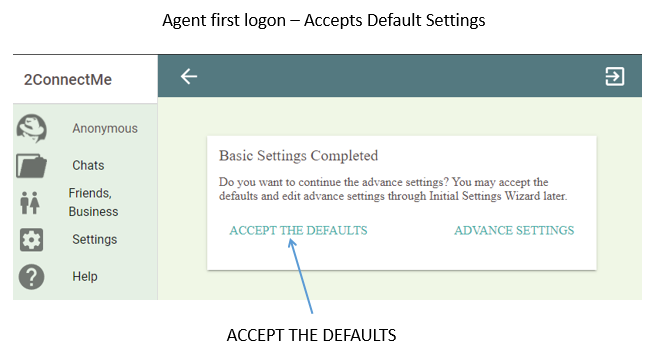
Then you may either Accept default settings, which is recommended for new users, or continue the detail system settings as screen shown below. Please take note that the “WhatsApp” setting is NOT activated by default. In case you would like to have “WhatsApp” agent settings, please continue “ADVANED SETTINGS” or “INITIAL SETTINGS WIZARD” on the next section of this document.
Successful registration and URLs
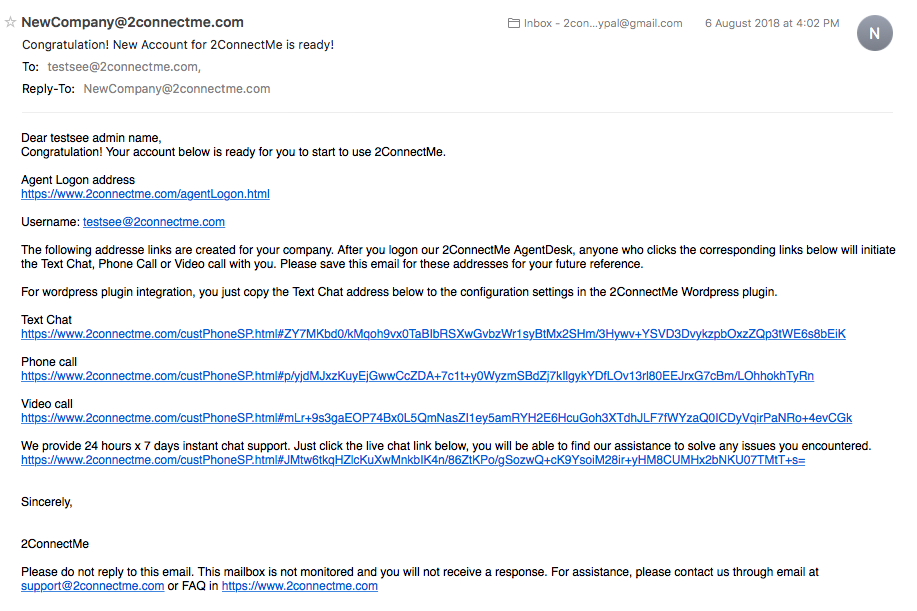
After validation of your email address, the address link of chat room named “GENERAL” for text chat (contact form), voice chat and video chat will be sent to your registered email address. If you do not find the “New Company” email in your Inbox in 1 minute, please check your Junk mailbox. Sometimes, email systems wrongly treat it as a Junk mail.
Step 2: Ready to serve you
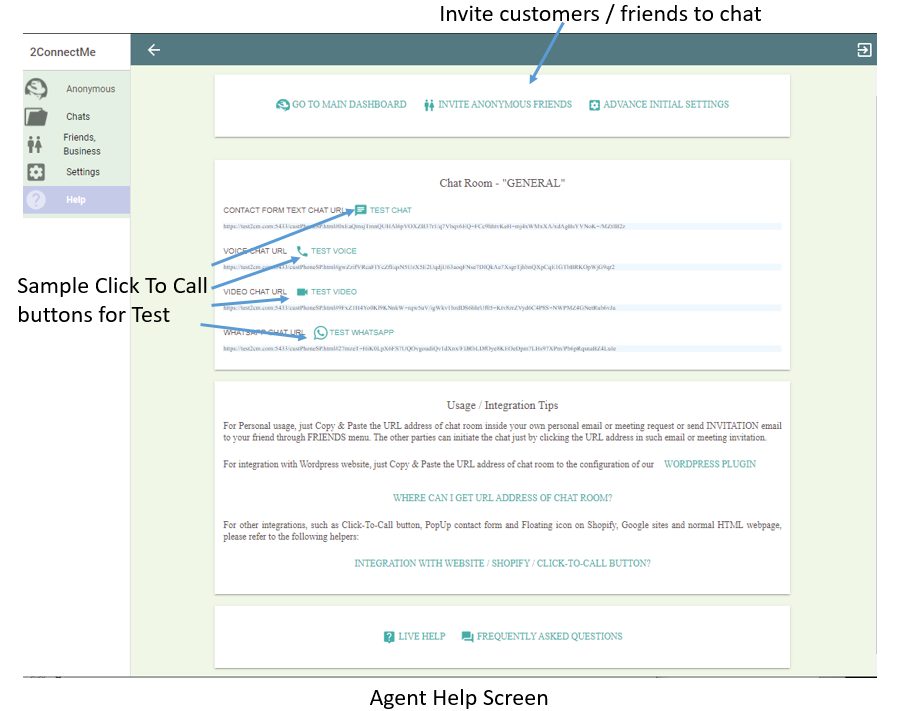
Then, you have your own chat room immediately.
Go to Help Screen and try to invite customer / friends to have a chat as screen shown below. It will send out an email with Private Chat Room Url for customer / friends to join the chat. Or you may try to click the sample “Click To Call” chat buttons to verify the system settings.
Chat with existing user of 2ConnectMe
When you click “Invite Anonymous Friends” button, you start to invite friend for a chat through email as screen shown below.
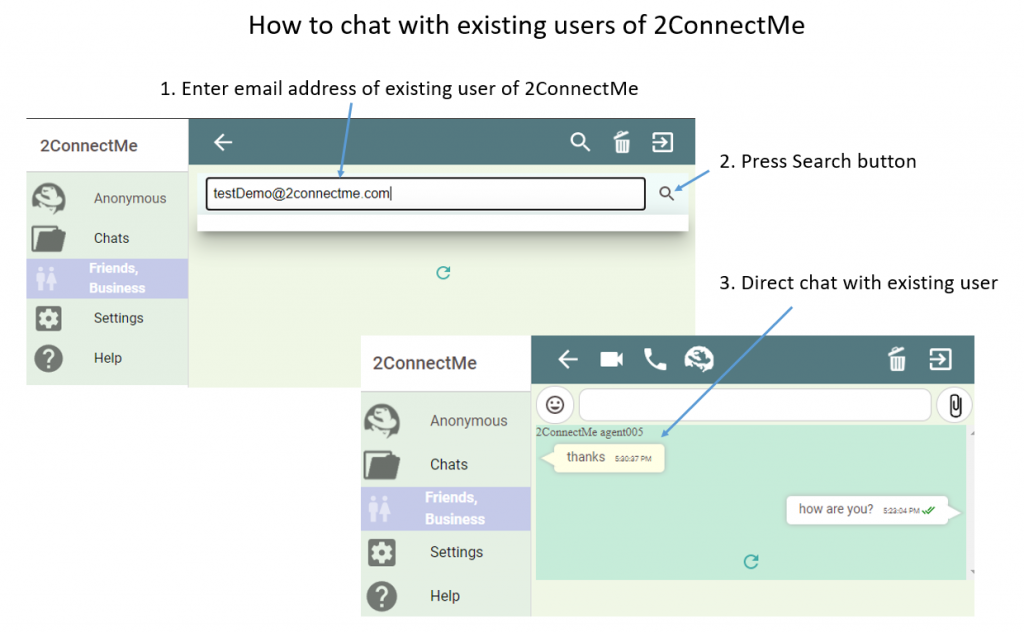
If the email address is the existing user of 2ConnectMe, it is possible to select DIRECT PRIVATE CHAT or still send email to ask for anonymous chat as screen below.
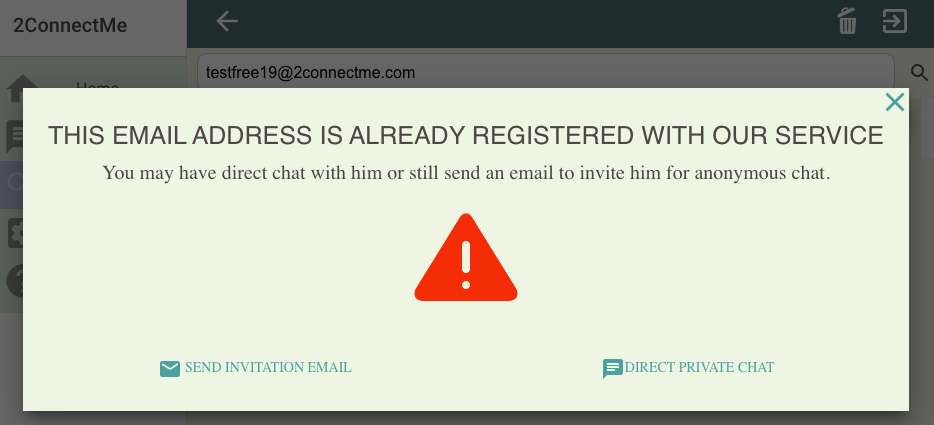
When DIRECT PRIVATE CHAT is clicked, the chat screen is immediately shown to provide the WhatsApp like function as screen above.
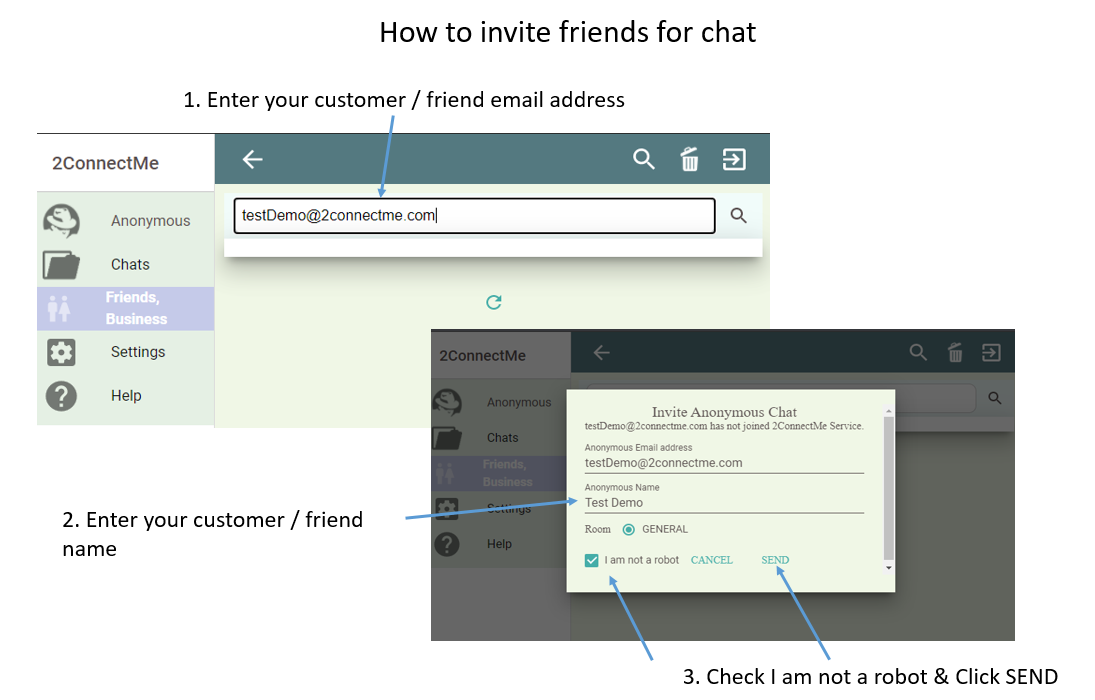
If the email address is not the existing user of 2ConnectMe, invitation dialog screen will be prompted to input the details of the anonymous for sending an invitation email. Details refer to the following section.
Invite Friend For Chat
When you click “Invite Anonymous Friends” button, you start to invite friend for a chat through email as screen shown below.
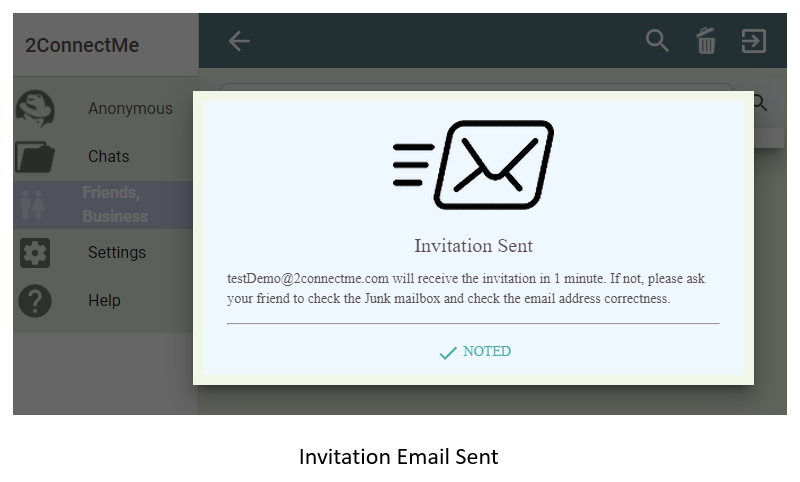
Invitation Email Sent
In case of incorrect unreachable email address, 2ConnectMe cannot know it in advance. Therefore, when customers / friends do not receive such invitation in 1 minute, you have to ask customers / friends to check their junk mailbox or the correctness of the email address.
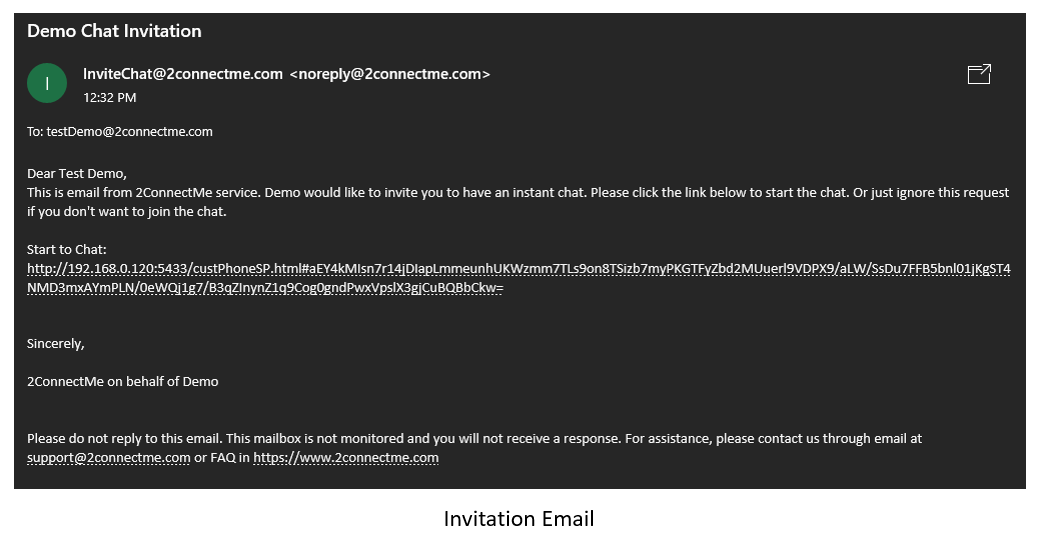
Customers / Friends will receive the following email. When the chat link Url is clicked, it will bring you to connect to an idle agent service staff, who, in this case, is yours, to serve immediately.
Customer Contact Form Looking for Idle Agent
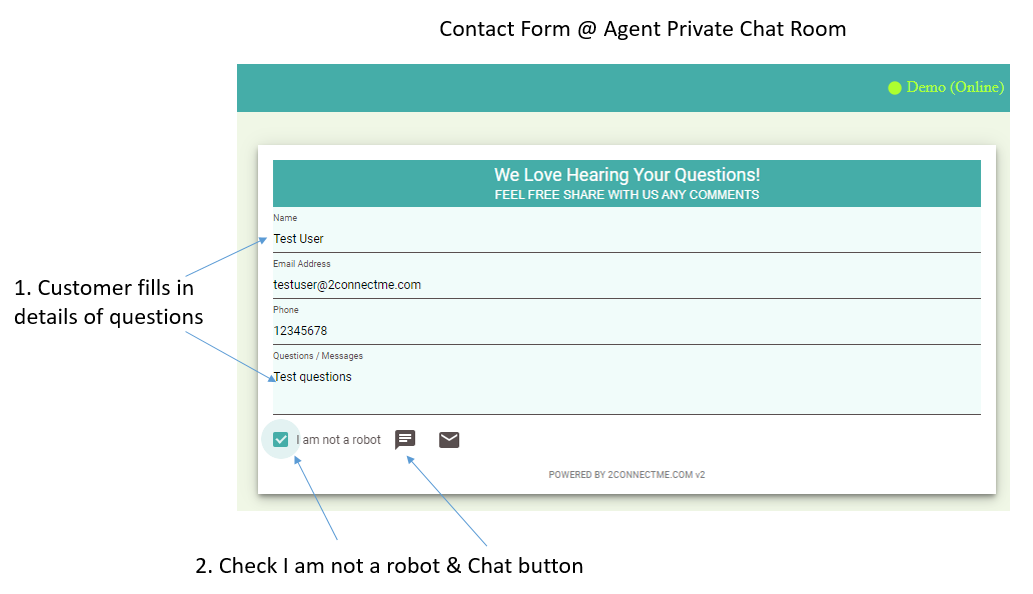
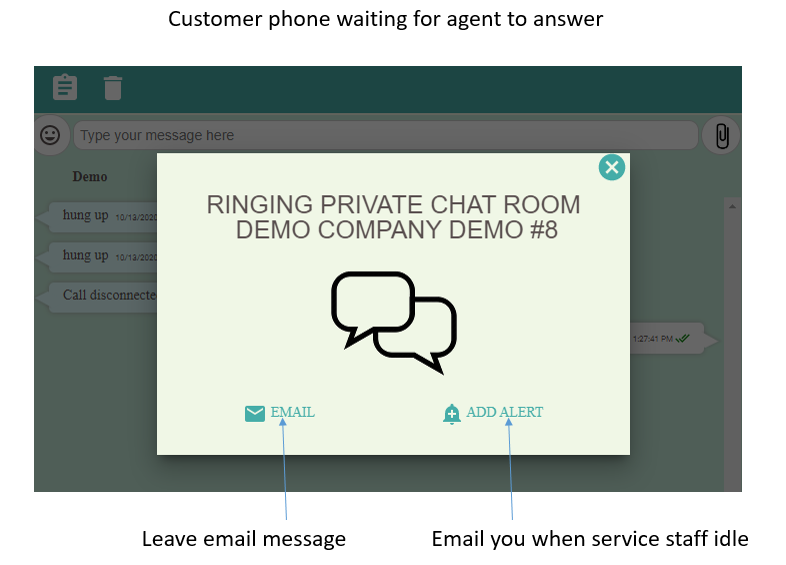
Customer Connecting to Agent In Progress
While customer is waiting for agent to answer the chat, customer can leave email message or activate an alert which 2ConnectMe will send email to customer when agent is idle.
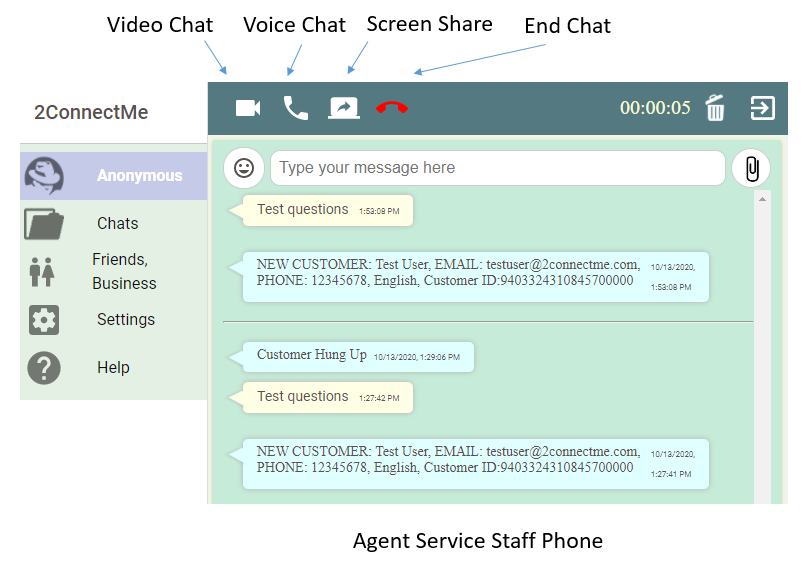
Agent Phone Ringing
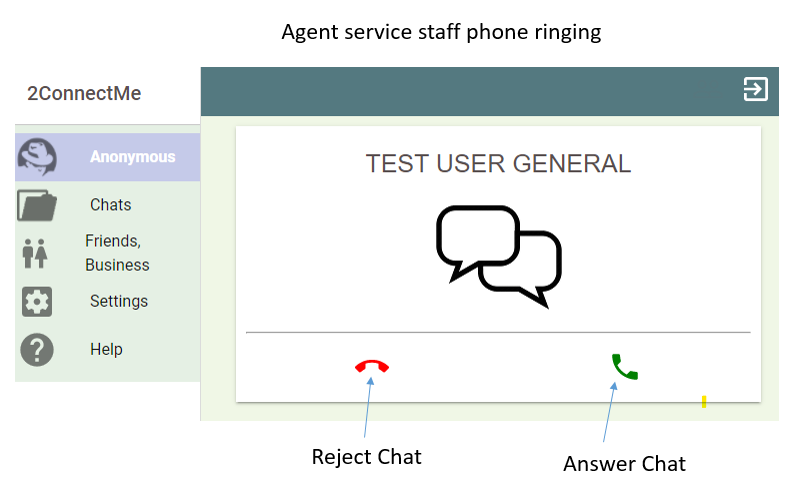
When agent answers the chat, agent is able to make voice chat , video chat, text chat and screen share with customer immediately.
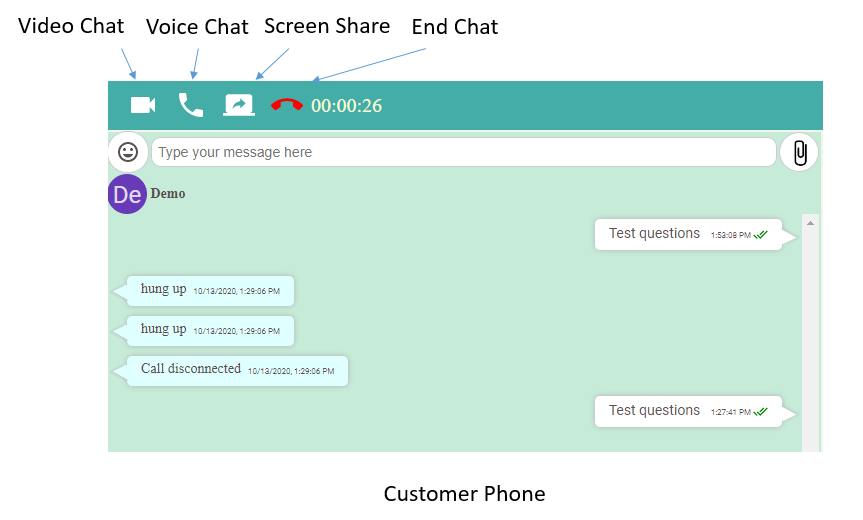
Customer Phone
Customer is also able to make voice chat, video chat, text chat and share screen with agent immediately.
Step 3: Integration
Facebook / Youtube
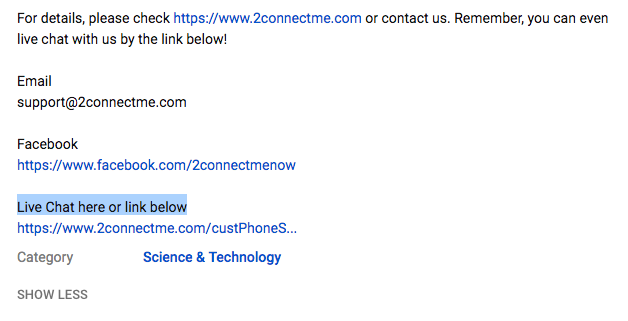
Using the new administrator account created, you logon either mobile Apps or through a Browser, you become ready for the calls from customers / anonymous who click the chat room address in the email above. Then, you can just paste the chat room address link to your social media, e.g. facebook, youtube, or your own meeting request for online meeting. Immediately Working. Yes, it is like a magic!
For example, you may check the youtube video here which we put our live chat URL at the end of video descriptions as a public contact channel.
Floating Button / Pop Up Contact Form on WordPress
When the WordPress plugin is installed, Your local WordPress website plugin is mainly for setting the colour and layout of the Floating Button and Whisper text shown on the website. The details of Contact Form layout and how the customer chats are distributed to agents are configured through the Public Chat Room Admin of 2ConnectMe Admin console, NOT in the WordPress Plugin Admin.
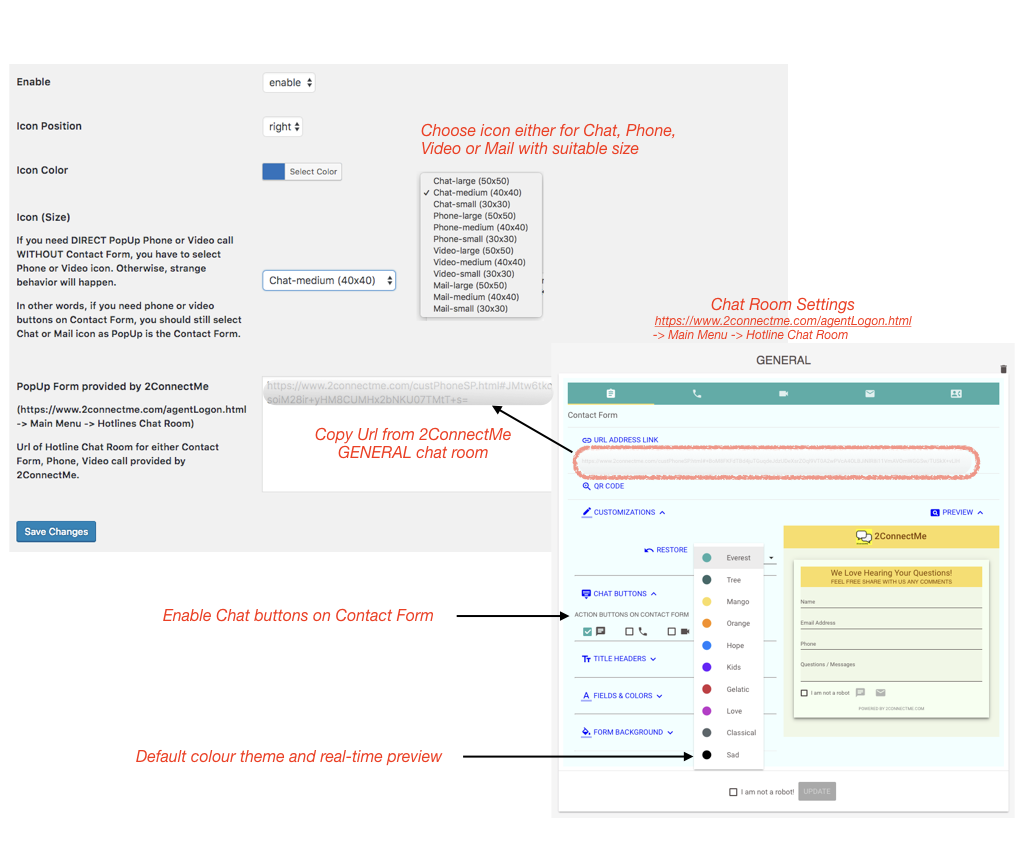
The only integration point with WordPress Plugin is URL of Chat Room from 2ConnectMe Admin console. With Forever Free account plan, the default chat room “GENERAL” is provided. It requires to copy URL of “GENERAL” chat room from Public Chat Room Admin and MANUALLY paste it on the settings of plugin admin page as shown below.
Contact Form in HTML webpages
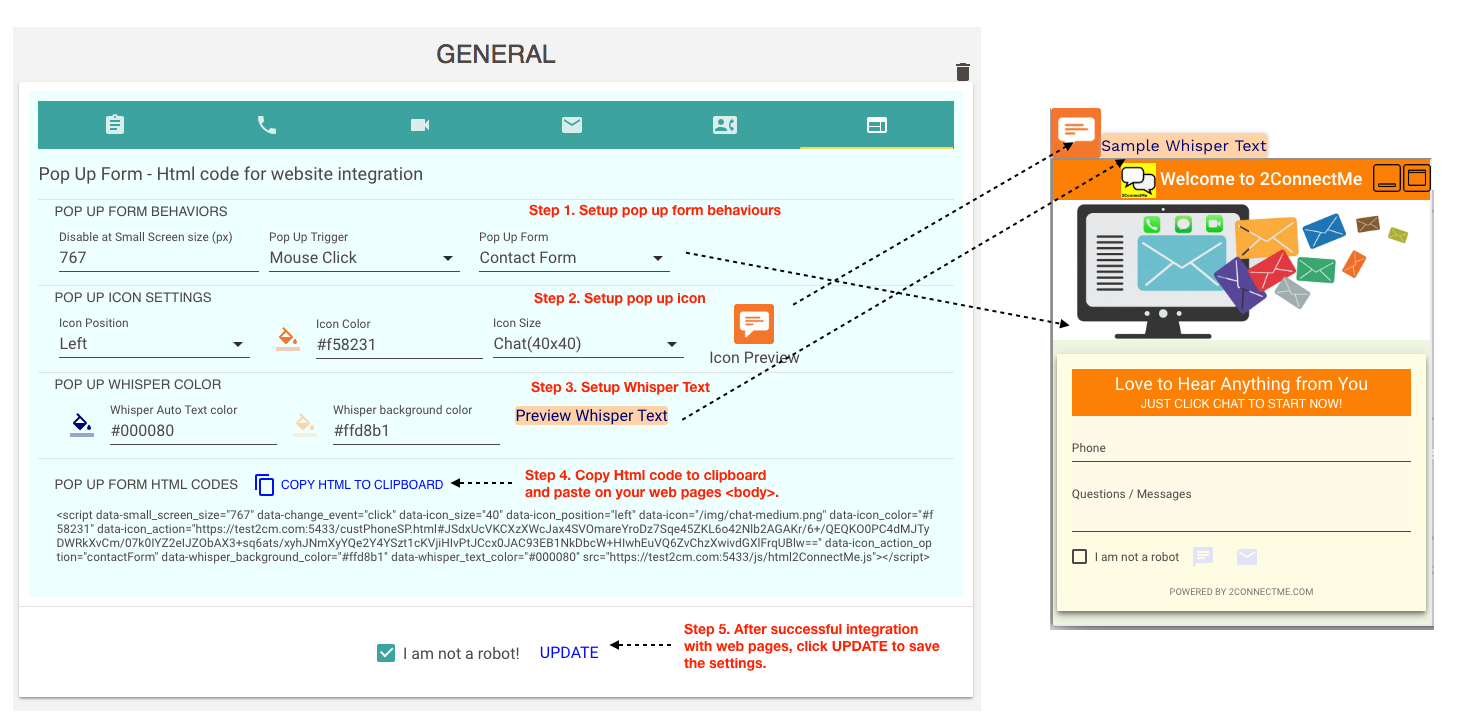
The following diagram shows how to setup HTML codes for the chat room in the Public Chat Room settings. Then, clicking “COPY HTML TO CLIPBOARD” and paste them inside <body> tag of any normal webpages. The webpages will then be empowered immediately with Floating icon with Pop Up either Contact Form, Direct Voice and Video chats.
Click to Call Button on any Website
Just copy the chat room URL in the email above and put under any html button with Click action.
